

Stripping for Success: Removing Old Furniture Finishes
A part of furniture refinishing occasionally requires starting with a clean slate using chemical strippers. This is my process for effective paint stripping and finding just the right product needed.

This post may contain affiliate links at a convince for you from Amazon or other publishers that I trust (at no extra cost). If you find this post helpful please consider supporting this site by using the links below to order the supplies listed. As an Amazon Associate I earn from qualifying purchases. See disclosure for more details.
Stripping furniture can be a good idea to embrace as a part of the furniture makeover process. It allows the preservation of intricate details while keeping the original details of the piece intact. It removes layers of paint, varnish, and other finishes to reveal the authentic beauty of the underlying wood. This method can provide an effective way to remove stubborn finishes. Stripping can be a gentle alternative to sanding. Minimizing the risk of over removal of the wood underneath.
Choosing the Right Product
When choosing unavoidable chemical products, I prefer to find those that are gentle on my heath and the environment. It is important to review all ingredient lists and avoid any strippers containing methylene chloride. Opt for water-based formulas with low VOCs. For a better idea of the product - read costumer reviews for prospective from other people who have tried and tested it. Avoid using strippers on furniture pieces not made of solid wood like MDF.
3 recommendations:

Safety Precautions
When using a paint stripper remember it is a chemical and to always wear proper protection.
Avoid strippers containing methylene chloride. Wear proper safety goggles, an apron, chemical resistant gloves, and a respirator or dust mask. Be sure to find a good spot to get messy in where no animals or other people will be threading through. Research your local recycling and chemical control for proper and safe disposal areas.
Tools and Equipment
PPE
Stripping Supplies
Neutralizing Supplies
Workspace Preparation
Choose a suitable workspace - make sure it is well ventilated. I prefer to be outdoors to minimize exposure to the fumes. Consider fans if you must work indoors. Cover and protect the surrounding areas including the floor with drop cloths or plastic sheeting to catch any drips or splatters. This can be a messy job and proper protection is essential. I do not fill any holes or damages in the piece until after i have completed the stripping process. Sometimes it can react with the chemicals and get goopy.
Application Steps
Gather materials in a well ventilated area - Collect all safety gear, paint stripping supplies, and supplies to neutralize it. Once I get started, I try not to navigate away too much because I don't want to accidentally get any chemicals on anything except the spot I prepared.
Gear up - Put on all safety gear - gloves, mask, apron, and googles.
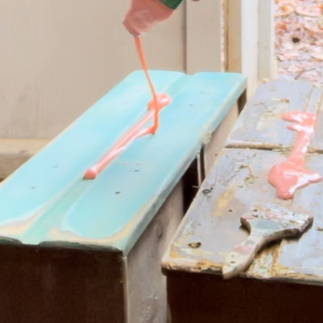
Apply - Use a chip brush to generously apply a layer of the stripper to the furniture surface. Evenly cover. My go to paint stripper at the moment is CitriStrip. It smells like oranges, stays wet and active for 24 hours, and is easy to use.


Tip: I find it easier to keep wet when I put plastic wrap over it. Sometimes I will take our plastic bags (like from Walmart or Dollar General), split them open, and put them over the solution instead of plastic wrap. It works well, too, and it's another way to reuse them.

4. Wait for the reaction - Allow the stripper to react to the paint or finish. It will usually look like it is shriveling up. Use a putty knife or scraper to gently scrape it. If it is loose and easy to remove then it is time for the next step.

5. Removing the goop - Use the scraper to remove the old finish - following the direction of the wood grain. Plastic putty knives are recommended to avoid gouging the wood, but sometimes I do use a metal one if the paint is extra thick. When using a metal scraper be a little more light handed, being as careful as possible. Wire brushes are great for the small and detailed areas. Put the goop into the metal can for disposal.


6. Repeat the process - If necessary for multiple layers or stubborn spots, this process can be repeated as many times as needed.
7. Neutralize the Surface - When completely done with the chemical stripper it needs to be neutralized. Usually, I use mineral spirits to stop the chemical reaction unless the paint stripper comes with a degreaser. Pour or spray mineral spirits onto the surface and use an abrasive sponge to scrub and neutralize the remaining goop. These Scrub Daddy Sponges work wonderfully for this job.
8. Clean the Surface - I wipe away all residue with a mixture of a mild cleaning agent, a mixture of dawn dish soap and water, with an abrasive sponge. It is important to remove all stripper or any remaining residue so it does not interfere with adhesion later on. After cleaning it with soap I will rinse it with water using a rag.

9. Sand the Surface - After removing the finish with the paint stripper I will usually sand with a 150 grit sandpaper then 180 grit. It depends on the piece, sometimes there is still stain left behind, or maybe I just want to even out the surface.

10. Clean up - dispose of all waste materials and clean the tools, and brushes thoroughly. Since I use chip brushes. I usually toss them, or I will wrap them in a plastic bag if I will be stripping again soon. Throw away these contaminated materials according to local regulations.
11. Once everything is stripped, sanded and cleaned it's time to move to the next step whether that be primer, paint, stain, or varnish.

Stripping small and detailed spaces: Wire brushes, steel wool sponges, and even a paint can opener are helpful tools when tackling small or detailed spaces.

In Conclusion,
Stripping furniture demands a little patience and precision. Create a successful refinishing process by avoiding common mistakes like insufficient ventilation, neglecting safety measures, or incompletely removing all residue. Don't forget to wear protective gear throughout the entire process. Share your favorite paint stripper brand in the comments! I would love to hear about what you use.
XOXo,
Kristen


